Happy Leap Day! I figured I should post today since I won't get to write another February 29th post for 4 years.
The last couple days I've been transforming photo mats with acrylic craft paint. I started with mats that came in frames that I picked up at garage sales and painted them to match my photos. It's simple but effective, and certainly a lot cheaper than buying custom mats. You can easily match cheap mats to team colors, wedding colors, school colors, or any other colors you want with just a couple coats of paint.
glue, tape, stickers, hockey...
Wednesday, February 29, 2012
Monday, February 27, 2012
DIY Toy Car Play Mat
I was inspired by this wonderful toy car play mat over at Punkin Patterns to create one of my own.
MATERIALS:
- sewing machine, notions, etc.
- a button
- a hair elastic
- 6 toy cars
- a piece of thin quilt batting 18.5" x 30.5"
- fabric:
2. Sew 1 short black strip to the side of each feature square (6 on the left, 6 on the right). Iron.

3. Sew the rows together. Iron. Sew one long black strip to the top of each row. Iron. Sew these new rows together. Sew the wide black piece to the bottom of your rows. Iron.
Fold your garage piece in half (right side out) so that it is now 18.5" x 5" and iron the fold. Line the open side up with the bottom edge and baste it on top of the wide black piece. The top is now complete.

4. Layer the batting, the piece for the back side (right side up), and the top (right side down). Place the elastic between the top and back on one side approximately 3.5" down from the top edge, with the majority of it inside and just enough sticking out to catch in the seam. Pin all the way around. Sew around the edge, leaving an opening for turning.

5. Trim the tips off the corners. Turn the mat right side out. Sew the opening shut.

6. Mark the center of the garage piece. Mark 2.75" and 5.5" from the center mark on both sides. Using top thread that matches the garage fabric and bobbin thread that matches the back side, sew lines up the garage at these 5 marks (from the bottom outside edge up to the black), turning 1 big pocket into 6 car-sized pockets. Backstitch at the ends.

7. Using yellow top thread and bobbin thread that matches the back side, sew down the center of all of the black strips. Backstitch at the ends. I sewed 1 big long line zigzagging across the mat on the long strips and down the short strips on the ends of the rows, then did the short strips in the center of the mat.

8. Put the toy cars in the garage pockets. Fold the mat in half top to bottom, then in half again the same way. Roll up the mat from the end opposite where your elastic is. Mark where you need to sew on the button so the elastic will loop around it and hold the mat closed. Sew the button on - be careful not to sew all the way through to the front side. DONE!

MATERIALS:
- sewing machine, notions, etc.
- a button
- a hair elastic
- 6 toy cars
- a piece of thin quilt batting 18.5" x 30.5"
- fabric:
- 1 of back side 18.5" x 30.5" - this is what will show when the mat is rolled up
- 1 of garage 18.5" x 10" - can be anything; mine is bricks
- 1 of black 18.5" x 6.5"
- 4 of black 18.5" x 2.5"
- 12 of black 4.5" x 2.5"
- 12 of feature 4.5" x 4.5" (square) - fabrics featuring things to drive on or around (buildings, rocks, grass, etc.)
- bobbins matching back side fabric
- top thread matching garage fabric
- yellow top thread
B-F-B-F-B-F F-B-F-B-F-B B-F-B-F-B-F F-B-F-B-F-B
2. Sew 1 short black strip to the side of each feature square (6 on the left, 6 on the right). Iron.

3. Sew the rows together. Iron. Sew one long black strip to the top of each row. Iron. Sew these new rows together. Sew the wide black piece to the bottom of your rows. Iron.
Fold your garage piece in half (right side out) so that it is now 18.5" x 5" and iron the fold. Line the open side up with the bottom edge and baste it on top of the wide black piece. The top is now complete.

4. Layer the batting, the piece for the back side (right side up), and the top (right side down). Place the elastic between the top and back on one side approximately 3.5" down from the top edge, with the majority of it inside and just enough sticking out to catch in the seam. Pin all the way around. Sew around the edge, leaving an opening for turning.

5. Trim the tips off the corners. Turn the mat right side out. Sew the opening shut.

6. Mark the center of the garage piece. Mark 2.75" and 5.5" from the center mark on both sides. Using top thread that matches the garage fabric and bobbin thread that matches the back side, sew lines up the garage at these 5 marks (from the bottom outside edge up to the black), turning 1 big pocket into 6 car-sized pockets. Backstitch at the ends.

7. Using yellow top thread and bobbin thread that matches the back side, sew down the center of all of the black strips. Backstitch at the ends. I sewed 1 big long line zigzagging across the mat on the long strips and down the short strips on the ends of the rows, then did the short strips in the center of the mat.

8. Put the toy cars in the garage pockets. Fold the mat in half top to bottom, then in half again the same way. Roll up the mat from the end opposite where your elastic is. Mark where you need to sew on the button so the elastic will loop around it and hold the mat closed. Sew the button on - be careful not to sew all the way through to the front side. DONE!

Thursday, February 23, 2012
DIY Make Your Floor Vent "Disappear"
I have this wonderful river rock flooring in my bathroom, but I couldn't stand the boring white floor vent cover, so I made it "disappear". Here's how I did it:
MATERIALS:
- camera
- printer and paper
- Mod Podge or white glue thinned with a little water
- spray paint that matches the main color in the flooring (optional)
- clear spray sealant
- exacto knife
1. Take a photo of the flooring where it repeats the same area as the spot where your vent cover is.

2. Print the photo on regular printer paper (mine took two sheets that I had to piece together) at the size you'll need to cover your vent cover plus wrap a bit around the edges. If you want to cover the "flap" below the grates, print a second copy.
3. If you want, spray paint the vent cover in a color that matches the flooring. This will ensure that all the edges are colored.
4. Put the vent cover in the vent and lay the printed photo on top so you can line it up with the pattern of the flooring. Stick the paper on with a small dot of glue or Mod Podge. Remove the vent cover and set it on some newspaper on your work surface (table, etc.).
5. Continue covering the front of the vent cover with Mod Podge and sticking down the photo. Wrap it around the edges and glue it to the underside.
6. Use the exacto knife to pierce the paper along the edges of the grates and Mod Podge these flaps of paper down to the grates. Flip the vent cover over to make it easier to see where you're applying the glue.
7. Trim the second photo to the right size and glue it to the "flap" below the grates.
8. Cover all of the paper with more Mod Podge. Spray it several times with clear sealant. DONE!

Monday, February 20, 2012
DIY Hockey Stick Headboard
This is a great project for hockey fans who hate to see things go to waste.
MATERIALS:
- broken hockey sticks (I used 8 blades and 4 pieces of shaft)
- tools (saw, drill, sander)
- tape measure
- screws
- hockey tape, hockey stickers (optional)
1. Measure your space, collect the sticks, and draw up a plan of what you want the headboard to look like. An equal number of left and right blades is required to make both sides match. Keep in mind where the tips of the blades on the outside edges will be.
I used 4 left and 4 right blades in varied lengths spaced 2" - 3" apart and 4 shafts (2 at my maximum length, 2 shorter) spaced 1.5" apart. I also lined up one of my blades so that its shaft would be on a stud in the wall where I wanted to put my headboard.
2. Remove all tape/stickers/residue from the sticks and wash them. If you like the look of the tape on them, add clean tape after removing the old tape and washing the sticks - the old tape will be covered in dirt, sweat, bugs, and all sorts of other things you don't want in the bedroom. Be careful with the broken ends, as they can be sharp and could give you slivers.

3. Lay the sticks out according to your plan. I put the shafts in front of the blades. Mark where you need to cut off ends and drill holes in order to screw the shafts to the blades.

4. Trim the ends and sand them to prevent sharp edges and slivers. Drill holes in the pieces that are going on top/in front (in my case, the shafts). Lay them on top of the other pieces (blades) and mark where they need to be drilled. Drill them. Also drill holes for screwing the completed headboard to the wall.

5. Screw the pieces together. I used 1.25" screws.
6. OPTIONAL: Decorate the sticks with hockey tape and stickers. I also used tattoos, which provided a really neat effect. Wrap the ends of the sticks with hockey tape as added protection against sharp edges and slivers. You can also add more stickers later.
7. Attach your headboard to the wall. DONE!

Thanks to my Dad for all his help with this project and to Doug and Scott for the sticks.
Friday, February 17, 2012
DIY Paint Your Own Hockey Player Figurine
A while back I found a set of hockey player figurines on sale and I couldn't resist them, even though I wasn't a fan of all the players included. Once I had them home, I used acrylic craft paint and a few other supplies to transform them into my favorite players.
MATERIALS:
- hockey player figurine
- reference photos of your favorite player
- acrylic craft paint in the colors shown in your photos
- paintbrushes
- matte or satin clear spray paint
- a sticker (or computer printout and glue) of the team logo, sized to fit on the figurine's chest
- silver metallic marker (optional)
- clear nail polish (optional)
1. You can get as fancy and detailed as you like, just take your time and keep referencing your photos. Start by painting everything the main/background colors, doing more than one coat if necessary to make sure it covers, then add the details like stripes, numbers, and the name. I used a silver marker for the skate blades.
2. Once you're happy with everything, stick the logo onto the front of the jersey. You can also print out the shoulder logos and helmet logos if you want to add those. You could even print off the numbers and name and stick them on instead of painting them.
3. Apply a few coats of clear spray paint to seal all the paint.
4. Use clear nail polish to make the skate blades and visor glossy, and to add "tape" lines on the player's socks. DONE!

The possibilities are endless once you get going; you could do your favorite junior player, your local hero, or even your child! All it takes is a few photos and a lot of patience. Good luck!
Wednesday, February 15, 2012
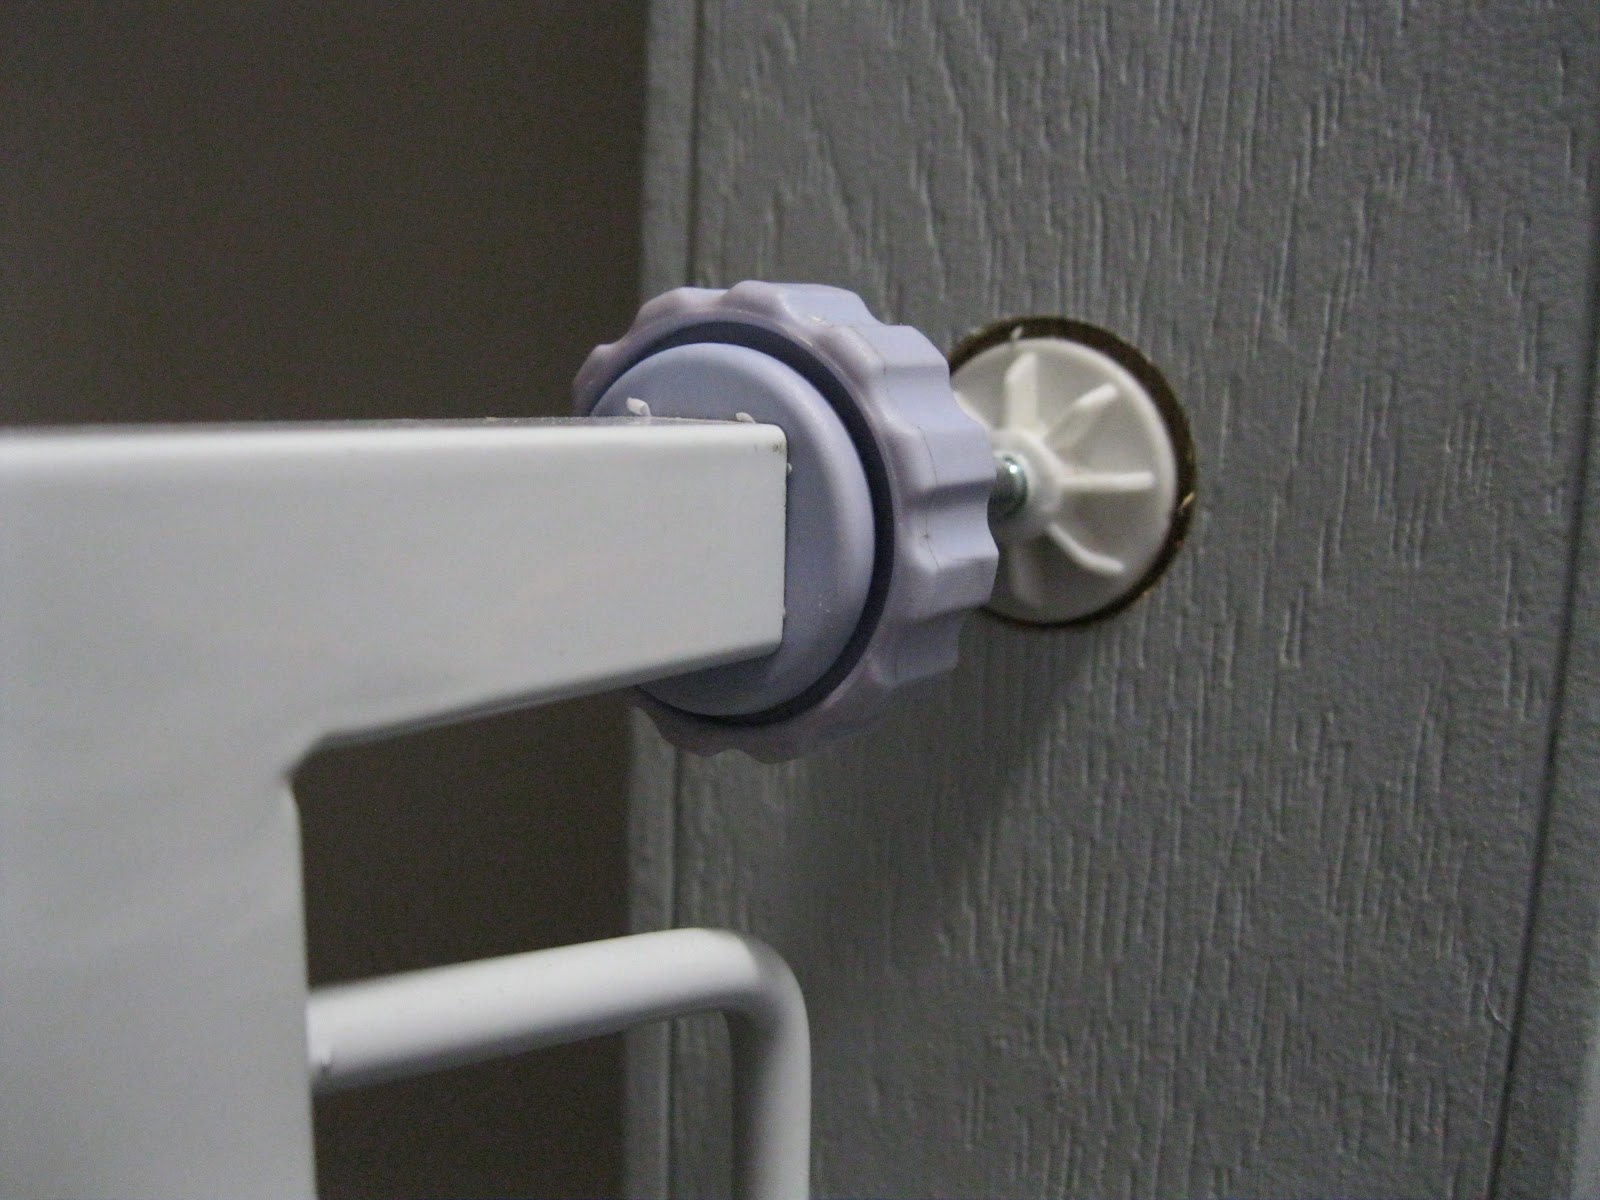
DIY Make a Tension-Style Baby Gate Sturdier
I say DIY, but I didn't do it myself and it really wasn't my idea, I was just insistent that there had to be a way to make our tension-style baby gate sturdier and kept bouncing ideas off people until my uncle came up with the best idea and my dad put it into effect for me.
This is for the type of baby gates that fit in a doorway with threaded rods on both sides that you tighten against the door frame. I couldn't get ours tight enough that I couldn't just grab it and tilt it, which left me fairly certain that if an adult was falling and reached for it to steady themselves, the gate would move and they would fall down the stairs.
Our solution was to use a drill bit that was slightly larger than the pads at the end of the threaded rods (not a hole-saw, a large drill bit) and drill into the door frame in the four spots where the ends of the rods touched. We put the gate in place first, leveled it and centered it, then traced around the pads, removed the gate, drilled, then replaced the gate and tightened the rods. DONE! No more movement in the gate, so no chance that the baby, the dog, or anyone can get (or fall) down the stairs without opening the gate. The only thing left is to paint inside the holes we drilled, but there's no rush on that. And if we ever want to remove the gate, a little drywall putty and paint will erase the holes.
Monday, February 13, 2012
Valentine's Baking: Angry Birds Cupcakes
If your Valentine is addicted to the game Angry Birds like mine is, here's a fun treat to whip up for him/her. I chose the red bird and used pictures off the internet for reference.
MATERIALS:
- cake mix and required ingredients or your favorite cake recipe and the ingredients
- oven, mixer, pans, bowls, measuring cups, etc.
- icing (canned, mix, recipe, whatever) in the following colors:
- toothpicks
- a piece of styrofoam or florist foam
- icing bags and tips OR small plastic bags
- spherical candies (mine were sour cherry but gumballs or others would work, it's the shape and color you're worried about); you need at least one per cupcake
1. Make and bake your cupcakes. I used a chocolate fudge cake mix that made 24. I put some baking chips in with the batter. You can start on the next step while they are baking.
2. Stick a toothpick into each of your candies, then stick the other end of the toothpick into the foam. This is so they don't roll around while you decorate them.
3. Apply a circle of white icing to the lower front of the candy. Stick a baking chip (beak) onto the icing at the top of this circle. I iced 5 then stuck on the chips, then did the next 5, and so on.

4. Add two small dots of white icing (eyes) to each candy just above your baking chip beak.

5. Using your chocolate/black icing, draw a V over the eyes for eyebrows. Make sure they look angry. Dot a tiny bit of chocolate/black icing onto each white eye to make a pupil.

6. Blob some red icing on the top of the candy to make feathers.

7. I put my birds in the fridge while I waited for my cupcakes to cool. Once the cupcakes are cool, retrieve your birds. Apply green icing to the tops of your cupcakes. I did mine with a knife but you can use your decorating bags/tips if you want. It should be a bit messy as it's supposed to look like grass.

8. Stick your birds in the green icing.

9. DONE! Clean up all the evidence and hide your creations until the perfect moment to surprise your Valentine.
MATERIALS:
- cake mix and required ingredients or your favorite cake recipe and the ingredients
- oven, mixer, pans, bowls, measuring cups, etc.
- icing (canned, mix, recipe, whatever) in the following colors:
- white
- green
- red (use food coloring paste OR liquid coloring and cocoa powder OR red Jello power)
- brown (chocolate OR add cocoa powder to white) OR black
- toothpicks
- a piece of styrofoam or florist foam
- icing bags and tips OR small plastic bags
- spherical candies (mine were sour cherry but gumballs or others would work, it's the shape and color you're worried about); you need at least one per cupcake
1. Make and bake your cupcakes. I used a chocolate fudge cake mix that made 24. I put some baking chips in with the batter. You can start on the next step while they are baking.
2. Stick a toothpick into each of your candies, then stick the other end of the toothpick into the foam. This is so they don't roll around while you decorate them.
3. Apply a circle of white icing to the lower front of the candy. Stick a baking chip (beak) onto the icing at the top of this circle. I iced 5 then stuck on the chips, then did the next 5, and so on.

4. Add two small dots of white icing (eyes) to each candy just above your baking chip beak.

5. Using your chocolate/black icing, draw a V over the eyes for eyebrows. Make sure they look angry. Dot a tiny bit of chocolate/black icing onto each white eye to make a pupil.

6. Blob some red icing on the top of the candy to make feathers.

7. I put my birds in the fridge while I waited for my cupcakes to cool. Once the cupcakes are cool, retrieve your birds. Apply green icing to the tops of your cupcakes. I did mine with a knife but you can use your decorating bags/tips if you want. It should be a bit messy as it's supposed to look like grass.


9. DONE! Clean up all the evidence and hide your creations until the perfect moment to surprise your Valentine.
Sunday, February 12, 2012
Valentine's Day Gift Idea: eBook
Want to give someone a unique gift this Valentine's Day? How about a new eBook for their iPad or iPhone? It's a great way to say "I love you" without adding to their clutter or their waistlines and to show them that you're interested in what they're reading. eBooks come in a variety of price ranges and you don't have to leave home to get them - just download them straight from your computer. It's a perfect "last minute" gift or something you can shop for with your loved one while cuddled up together by the computer sharing hot chocolate in the candlelight.
Here's my favorite eBook (okay, so I wrote it, but it's still my favorite ☺) available from Blurb: The Phantom of Lone Pine Lake.

Here's my favorite eBook (okay, so I wrote it, but it's still my favorite ☺) available from Blurb: The Phantom of Lone Pine Lake.
Don't forget that if you want to get a paper book for that special someone you can make your own custom gift bag out of magazine pages by following my tutorial here: DIY Gift Bag from Magazine Pages.
Friday, February 10, 2012
Elk Point's Hockey Stars Have Yet to Cross Sticks
Elk Point, Alberta - population 1400 - is the hometown of 2 NHL players: Dallas Stars defenseman #44 Sheldon Souray and Columbus Blue Jackets forward #17 Mark Letestu. It is impressive that such a small town has produced 2 of the approx. 800 current NHL players, but what's strange is, the 2 have never played against each other (or with each other) in their professional careers.
Mark spent the first three years of his pro career in the AHL before making the jump to the NHL last season, which Sheldon spent in the AHL after several years in the NHL. This year both players were finally in the same league, but a series of events ensured that they never met on the ice again this year.
Mark began the season with the Pittsburgh Penguins, so he missed the first CBJ VS. DAL game, then was traded to Columbus prior to the first PIT VS. DAL game. When the second CBJ VS. DAL game rolled around, Sheldon was out of the line-up with an ankle injury. Mark missed the final CBJ VS. DAL game of the year with a broken hand.
Barring a trade or a string of miracles propelling both teams to the Stanley Cup final, the 2011-12 NHL season will end without Elk Point's 2 stars ever crossing sticks. Looks like fans of "Wonder Bomb" and "Marksman" will just have to wait for next season to see which Elk Point native is victorious.

Thursday, February 9, 2012
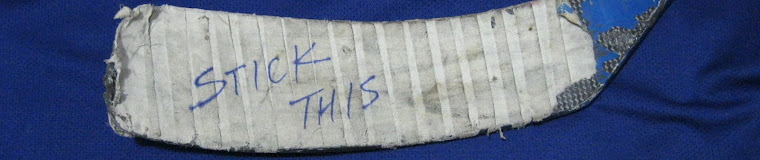
How to Display a Hockey Stick
A few years ago I purchased a game-used, autographed hockey stick and was immediately confronted with the problem of how to display it without damaging it. A quick search online provided several difficult or expensive options that simply weren't for me. After much pondering I finally turned to my favorite method of sticking things on walls: 3M Command products.
I purchased two 3M Command cord bundlers, which are the PERFECT size to hold a hockey stick, and wrapped them in hockey stick tape that corresponded with the color of tape already on the stick. This both camoflauged the cord bundler and added grip, which allowed me to hang the stick at an angle without fear of it slipping. I looped the cord bundlers around the stick, peeled off the sticky backs, and pressed the whole thing onto the wall. After holding it in place for 30 seconds, I opened the cord bundlers and removed the stick for 1 hour so the adhesive could stick to the wall firmly. Once they were firmly stuck, I looped them back around the stick and closed them - DONE! No damage to the stick or walls.

I purchased two 3M Command cord bundlers, which are the PERFECT size to hold a hockey stick, and wrapped them in hockey stick tape that corresponded with the color of tape already on the stick. This both camoflauged the cord bundler and added grip, which allowed me to hang the stick at an angle without fear of it slipping. I looped the cord bundlers around the stick, peeled off the sticky backs, and pressed the whole thing onto the wall. After holding it in place for 30 seconds, I opened the cord bundlers and removed the stick for 1 hour so the adhesive could stick to the wall firmly. Once they were firmly stuck, I looped them back around the stick and closed them - DONE! No damage to the stick or walls.

Wednesday, February 8, 2012
Cardboard Shelves
Ever since I saw a tutorial for creating shelving out of cardboard on Instructables, I've been using the principles to create shelving and storage all over my house. Layered and/or interlocking pieces of cardboard - with the corrugations running vertically - are incredibly strong, yet light-weight, free, and easy to work with. All you need are some scissors, glue, tape, an exacto knife, and cardboard.
In the kitchen, above my stove to hold my spices, salt & pepper shakers, and toothpicks:

In the kitchen, two corner shelves with Coca-Cola bags as the tops/bottoms of the shelves:

Solving the wasted space/where to put the DVD player; covered in old comic book pages:

More comic book pages cover this one, which is screwed to the wall to support the weight of the movies:

A special yin-yang one for the baby's room, inspired by one on Instructables:

These shelves are so fun to make that I plan on making more - I'll post photos as I do.
Tuesday, February 7, 2012
I ♥ 3M Command Strips!
(If that little heart didn't show up for you, sorry.)
I use 3M's Command strips and hooks for all sorts of things around my house. They come in such a wide variety and they don't damage your walls. I use the little clear hooks and the decorating clips for hanging my jewelry (rings, necklaces, bracelets), wall-hangings, and other decorations, and I use the picture hanging strips (they are like Velcro) for hanging frames, bulletin boards, and some of the cardboard shelves I have created. The hooks are great for in the baby's room since I'll be able to move/remove them as required while the strips are great in the kitchen to attach things to the tiles. I also use the big hooks for hanging oven mitts, purses, bags, and the magazine rack in my bathroom, and a medium hook to hang my bottle brush by my kitchen sink. I even used the cord bundlers to hang my autographed hockey sticks in our sports bar - they won't damage the sticks and I wrapped them in hockey tape so they are practically invisible.

Now I just need them to invent a hook strong enough to hold up the Jolly Jumper...
Monday, February 6, 2012
A Valiant Effort
Well, after a couple spectacular victories, my Oilers lost tonight. I didn't get to watch the entire game, but I thought they played well. We can't win them all, but we can take some positives from tonight's effort and carry them into our next game on this road trip. I've got my fingers crossed for our injured coach and superstar rookie - hope they are both able to shake it off and get back on the bench for the next game.
Sunday, February 5, 2012
DIY Toddler Couch

Toddler furniture is adorable and fun, but often quite expensive and rarely matches your decor, which is why I decided to design and build my own toddler couch.
Isn't it cute?! It turned out so well. I'm so happy with it. And guess what it's made of... GARBAGE. That's right; it's all recycled junk. My cost was $0 and it weighs almost nothing.
You may end up spending a bit of money on the materials, but it's a lot of fun to make and will still cost less than a store-bought version.
MATERIALS:
- a corrugated cardboard box, preferably with a solid bottom (I used a box from office paper)
- extra pieces of cardboard
- foam pieces in various sizes and thicknesses (I've saved them from the packaging around furniture, applicances, etc.)
- fabric (I used upholstery samples)
- glue gun and/or white glue
- scissors, exacto knife and cutting mat
- masking tape
- sewing machine, thread, pins, needle
- marker
- paint that matches your fabric (optional)
- 4 stick-on furniture "feet" (optional)
1. Cut one long side off your cardboard box. Cut the short sides in half horizontally. This is your frame.
Cut and stack pieces of cardboard that are the same size as your short sides (arms) until you have them about 1" thick, then glue them together and glue them inside your frame. Use tape to hold them while the glue dries.
Cut 1" strips of cardboard and form a grid with them by cutting out notches and interlocking them. Glue to the long side (back). Add short pieces as extra braces anywhere your grid seems a little weak.
Cut a few pieces of cardboard that are the same size as the bottom of the inside of your frame. Glue them together and glue them down. Tape the front edge for added support.

2. Cut and attach pieces of cardboard to cover all of your "edges".

3. Cut and attach pieces of foam to cover the arms (inside, outside, top) and back (inside, top).

4. Lay pieces of fabric over the arms and back with the wrong side out. Use pins and/or a marker to mark where you need to cut, sew, and join. You may want to try it with cheap/scrap fabric first, then use that as a pattern for your actual fabric. I made the arm covers first, then the back, then joined them. Make sure you leave enough fabric around the bottom edges to glue to the bottom (inside) and underside.
Pull the finished cover over the frame/foam and glue the edges down to the bottom (inside) and underside. Cut a strip of fabric and glue it along the front edge of the bottom.
Measure the space for the cushion and sew it and stuff it. Glue just the bottom of it to the frame.

5. To finish the underside, I painted the cardboard with acryic craft paint that matched my fabric and stuck 4 furniture feet under the corners.
6. DONE! Now, I've assumed that you know a bit about sewing, so I hope you don't have too much trouble with that part. Basically, the old saying "measure twice, cut once" applies. Just take your time. I also haven't included many dimensions because it completely depends on the size of your box and the size you want things to be. You could definitely make it fancier than I did - to the point of replicating one of your own couches or one you like in a catalogue. If you decided to add legs, make sure you brace the bottom with the grid like we did on the back so that it won't bend.
Enjoy watching your little one(s) lounge on their own little couch in their playhouse, bedroom, or in the living room in front of the TV!
Friday, February 3, 2012
GR8 Players 4GE History
Get it? No? Sound it out. GR8 = great. 4GE = forge. Great players forge history. Why the numbers? Well, not only did my Edmonton Oilers beat the Chicago Blackhawks 8 - 4 last night - while I was in attendance no less - but #89 Sam Gagner scored 4 goals and tied the Oilers points/game record with 8 points. Since the end of the game last night I've been playing with words in my head trying to think of something witty to put on a hat to give to Sam, since I did not throw my beloved 2010 Draft hat onto the ice after his third goal. My best ones were:
GR8 PLAYERS 4GE HISTORY
VICTORY IS 4 GR8 PLAYERS
What do you think? Suggestions?
I'm picturing writing out the full words in white with the numbers in orange behind their respective words, but we'll see how it goes. I'll post pictures when/if I get it done.
I'm still processing how amazing it was to be a witness to history last night. It took me all day to find someone to come with me - to the point where I was wondering if I would be going alone or not going at all - and finally got ahold of a friend who didn't already have plans. It was even her FIRST NHL game, which made the night even more special.
It also hasn't escaped me that it was Groundhog Day yesterday, and if you've ever seen the Bill Murray movie "Groundhog Day", where his character repeats the same day over and over, you'll understand the irony of watching the same thing happen over and over: Gagner scores! Gagner scores! Gagner scores! Gagner scores!
DIY Gift Bag from Magazine Pages
Here is a tutorial for making a custom gift bag out of magazine covers and pages. For tutorials on turning envelopes or newspaper pages into gift bags, visit: http://howaboutorange.blogspot.com/.
MATERIALS:
- 2 magazines that you can remove the ENTIRE cover in ONE piece
- 2 magazine pages with pictures/text that you like
- coordinating pictures (optional)
- scissors
- glue
- tape
- single hole punch
- ribbon, cord, or string

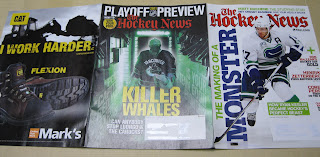
Here I have some spare pages, two full-sized pages (goalie and skater), and two full covers (remove the staples and spread open flat). *I used pages from my favorite magazine, The Hockey News, which always has great covers, photos, and articles.
DISCLAIMER: This is for a friend who is a Canucks fan - it would NOT be my first choice of teams if the bag was for myself.
1. Layer your two covers so that they are both face-up with one front cover (goalie) on top of the back cover of the other (skater). Glue together. I used spray glue.
2. Flip everything over so you are looking at the insides of the covers but the text/photos are right-side up. Position your full-sized pages so that one is on the inside of the center page (goalie front cover) and the other is on the inside of the right page (goalie back cover). DOUBLE CHECK that you haven't got both of them on the back of your front covers. Glue.

3. Fold the right sight into the center THEN fold the left side in on top. DOUBLE CHECK that your full-page photos are face-to-face on the inside and that both your front covers are on the outside. Glue the back of your full-page photo to the back of the front cover that you haven't glued to yet.

4. You should now have a flat tube with your full-page photos on the inside and your front covers on the outside.

5. Lay your "tube" on a flat surface. Fold the sides in at approx. 1" (2.5cm) and crease well. Open it back up. Fold the bottom up at approx. 2" (5cm) and crease well. Open it back up.

6. Fold and crease all these folds to the back also. When you do the side folds, puff the tube out and shift the edge from the joint between your covers to one of your new folds, then flatten it again so that you can tape down your joint to reinforce it. I used clear hockey tape.

7. Puff up your tube again and pinch your side folds so that it looks like a rectangle from the end. Slowly push in the side "flaps" of the bottom using your folds to keep the corners sharp.

8. Once you have your folds where you want them, crease them firmly and fold the newly formed (almost triangular) front and back flaps on top of your side flaps. Crease. Secure your layers with glue and/or tape.

9. If you want your bag to be able to lie flat, push in the sides (where you taped the seams) and fold the bottom to one side and crease.

10. Now your bag is basically complete. If you want, you can glue one of your spare pictures inside the bottom of the bag to hide your flaps.

11. You can either fold the top of your bag over and tape or staple it to close it (with the gift inside, obviously), or you can add handles. To add handles, pinch the top of the bag shut and punch two holes through both the front and back of the bag. Tie coordinating ribbon, cord or string through the holes, either in a circle or U-shape with big knots at the ends. You could also skip the holes and just glue and/or tape a loop of ribbon or string to the inside of both sides of the bag. *If you want to make a gift tag for your bag with your spare pictures and cardstock, make sure you add it to your handle BEFORE you knot or glue. If you forget, just add another piece of ribbon or string to your gift tag and tie it onto your handle.

12. DONE! You can use some of your spare pictures and pages to make a matching greeting card, decorated envelope, or even in lieu of tissue paper to hide the gift inside.
MATERIALS:
- 2 magazines that you can remove the ENTIRE cover in ONE piece
- 2 magazine pages with pictures/text that you like
- coordinating pictures (optional)
- scissors
- glue
- tape
- single hole punch
- ribbon, cord, or string

Here I have some spare pages, two full-sized pages (goalie and skater), and two full covers (remove the staples and spread open flat). *I used pages from my favorite magazine, The Hockey News, which always has great covers, photos, and articles.
DISCLAIMER: This is for a friend who is a Canucks fan - it would NOT be my first choice of teams if the bag was for myself.
1. Layer your two covers so that they are both face-up with one front cover (goalie) on top of the back cover of the other (skater). Glue together. I used spray glue.

2. Flip everything over so you are looking at the insides of the covers but the text/photos are right-side up. Position your full-sized pages so that one is on the inside of the center page (goalie front cover) and the other is on the inside of the right page (goalie back cover). DOUBLE CHECK that you haven't got both of them on the back of your front covers. Glue.

3. Fold the right sight into the center THEN fold the left side in on top. DOUBLE CHECK that your full-page photos are face-to-face on the inside and that both your front covers are on the outside. Glue the back of your full-page photo to the back of the front cover that you haven't glued to yet.

4. You should now have a flat tube with your full-page photos on the inside and your front covers on the outside.

5. Lay your "tube" on a flat surface. Fold the sides in at approx. 1" (2.5cm) and crease well. Open it back up. Fold the bottom up at approx. 2" (5cm) and crease well. Open it back up.

6. Fold and crease all these folds to the back also. When you do the side folds, puff the tube out and shift the edge from the joint between your covers to one of your new folds, then flatten it again so that you can tape down your joint to reinforce it. I used clear hockey tape.

7. Puff up your tube again and pinch your side folds so that it looks like a rectangle from the end. Slowly push in the side "flaps" of the bottom using your folds to keep the corners sharp.

8. Once you have your folds where you want them, crease them firmly and fold the newly formed (almost triangular) front and back flaps on top of your side flaps. Crease. Secure your layers with glue and/or tape.

9. If you want your bag to be able to lie flat, push in the sides (where you taped the seams) and fold the bottom to one side and crease.

10. Now your bag is basically complete. If you want, you can glue one of your spare pictures inside the bottom of the bag to hide your flaps.

11. You can either fold the top of your bag over and tape or staple it to close it (with the gift inside, obviously), or you can add handles. To add handles, pinch the top of the bag shut and punch two holes through both the front and back of the bag. Tie coordinating ribbon, cord or string through the holes, either in a circle or U-shape with big knots at the ends. You could also skip the holes and just glue and/or tape a loop of ribbon or string to the inside of both sides of the bag. *If you want to make a gift tag for your bag with your spare pictures and cardstock, make sure you add it to your handle BEFORE you knot or glue. If you forget, just add another piece of ribbon or string to your gift tag and tie it onto your handle.

12. DONE! You can use some of your spare pictures and pages to make a matching greeting card, decorated envelope, or even in lieu of tissue paper to hide the gift inside.
Thursday, February 2, 2012
Good Morning! Time for a Coke...
What's so good about this morning? you ask.
Well, you woke up, didn't you? my friend's dad would reply.
And he would be right - shouldn't we be glad every morning that we wake up? Shouldn't we be grateful for our warm home and comfy bed and good health? Shouldn't we be happy to simply wake up in a place where we don't have to fear being bombed or shot or otherwise terrorized while we sleep? The simple answer to all of these questions is: we should be. So, good morning!
Some people start their mornings with a cup of coffee or a glass of juice; I start mine with a can of Coca-Cola. Gross, right? And unhealthy too. I know. But there is less caffeine in Coke than in coffee and no more sugar in it than many types of juice, so really, what difference is there? Not much. And it's probably my worst habit, and considering the many things I could be drinking/smoking/doing, I don't consider a can of Coca-Cola a terrible vice. Besides, I love it. I love Coca-Cola. I love the taste, the fizz, the logo, the red/white color scheme, the collectibles... You should see my house. I'll post some photos. Bears, cans, tins, salt & pepper shakers, books, Monopoly, lamps, pencils, magnets... I even have a mini Coke machine in my kitchen and a mini Coke fridge in our bar downstairs. I try to limit the collection to a few areas of the house, but it tends to spread... Here's a small sample - just the space above the kitchen cupboards:
.jpg)
Subscribe to:
Posts (Atom)